This article provide a guidance to complete GSP328 Serverless Cloud Run Development: Challenge Lab. It won’t provide steps directly, only tips to finish the lab. The challenge contains 7 tasks. As it has staging and production environment, so actually is 3 different sets of tasks. Provision the Qwiklabs environment run those commands to set config and …
This blog post is recording my journey on proof of concept development on ionic 4 capacitor & PWA development in December 2018, just note down some obstacles I faced or founding in the journey, and this is not a tutorial. Although Progressive Web Apps (PWA) are installable without app store, as of today business requirement …
唔想每個server 行一次 ssh 再run command,寫個script 同做一次所有servers 既時間差。不過下次再run 就可以慳好多時間。IaC / automation always win. Ansible playbook 可能都有,可惜冇機會用到Ansible 。 放左去gist。有用既請拍下 likecoin ,Thanks:)
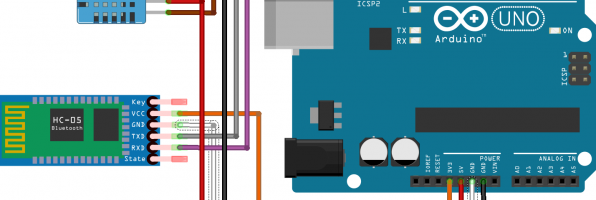
I have brought a arduino kit in 2016 but haven’t played with it. Finally have some taste on it. Install sketch – official software from arduino Add “Adafruit unified sensor” & SimpleDHT library in sketch, then create a new file. Code
|
1 2 3 4 5 6 7 8 9 10 11 12 13 14 15 16 17 18 19 20 21 22 23 24 25 26 27 28 29 30 31 32 33 34 35 36 37 38 39 40 41 42 43 44 45 46 47 48 49 50 51 52 53 54 55 56 57 58 59 60 61 62 63 64 65 66 67 68 69 70 71 72 73 74 75 76 77 78 79 80 81 82 |
/* install "Adafruit unified sensor" and simpleDHT library in sketch */ #include <Adafruit_Sensor.h> #include <DHT.h> /* Include the software serial port library */ #include <SoftwareSerial.h> /* to communicate with the Bluetooth module's TXD pin */ #define BT_SERIAL_TX 10 /* to communicate with the Bluetooth module's RXD pin */ #define BT_SERIAL_RX 11 /* Initialise the software serial port */ SoftwareSerial BluetoothSerial(BT_SERIAL_TX, BT_SERIAL_RX); /* what digital pin DHT connected to */ #define DHTPIN 7 // Uncomment whatever type you're using! #define DHTTYPE DHT11 // DHT 11 //#define DHTTYPE DHT22 // DHT 22 (AM2302), AM2321 //#define DHTTYPE DHT21 // DHT 21 (AM2301) DHT dht(DHTPIN, DHTTYPE); void setup() { Serial.begin(9600); Serial.println("Temperature and Humidity to bluetooth"); dht.begin(); BluetoothSerial.begin(9600); delay(1000); // Should respond with OK BluetoothSerial.print("AT"); waitForResponse(); // Should respond with its version BluetoothSerial.print("AT+VERSION"); waitForResponse(); // Set pin to 1234 BluetoothSerial.print("AT+PIN1234"); waitForResponse(); // Set the name to BLU BluetoothSerial.print("AT+NAMEBLU"); waitForResponse(); Serial.println("Finished setup!"); } void loop() { // Give it time to calibrate delay(10000); float h = dht.readHumidity(); // Read Celsius float t = dht.readTemperature(); // Read Fahrenheit (isFahrenheit = true) float f = dht.readTemperature(true); // Check errors if (isnan(h) || isnan(t) || isnan(f)) { Serial.println("Failed to read from DHT sensor!"); return; } // Compute heat index in Fahrenheit (the default) // float hif = dht.computeHeatIndex(f, h); // Compute heat index in Celsius (isFahreheit = false) // float hic = dht.computeHeatIndex(t, h, false); Serial.println("Humidity: " + String(h) + "%, Temperature: " + String(t) + "^C"); BluetoothSerial.println("Humidity: " + String(h) + "%, Temperature: " + String(t) + "^C"); } // Function to pass BlueTooth output through to serial port output void waitForResponse() { delay(1000); while (BluetoothSerial.available()) { Serial.write(BluetoothSerial.read()); } Serial.write("\n"); } |
Verify code, then connect the Ardunio board, and upload the file. If it …
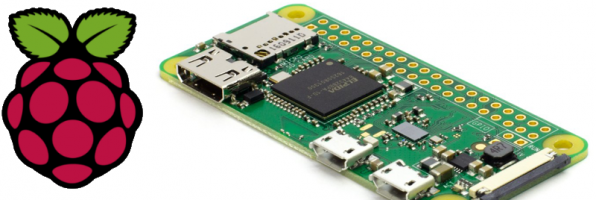
headless setup according to https://core-electronics.com.au/tutorials/raspberry-pi-zerow-headless-wifi-setup.html unfortunately it does not work for me, there is no IP address assigned in router info page. Connect Pi Zero W with HDMI and USB keyboard. I don’t have mini-USB to USB converter, surprisingly the OTG converter works. $ sudo vim.tiny /etc/wpa_supplicant/wpa_supplicant.conf
|
1 2 3 4 5 6 7 8 9 10 11 12 13 14 15 16 17 |
ctrl_interface=DIR=/var/run/wpa_supplicant GROUP=netdev update_config=1 country=AU # Home Network network={ ssid="SSID1" psk="password1" key_mgmt=WPA-PSK } # Office Network network={ ssid="SSID2" psk="password2" key_mgmt=WPA-PSK } |
Since default locale is en_GB, the keyboard …
recently migrated wordpress to GCP, using cloud launcher – wordpress by bitnami. That pretty easy, google other tutorials and follow it. e.g. https://console.cloud.google.com/launcher/details/bitnami-launchpad/wordpress http://www.compoundtheory.com/migrating-my-blog-to-google-cloud-platform/ Set up here is some highlighted procedures 1. create compute engine via clound launcher 2. create cloud SQL – db username and password 3. mysqldump old wordpress database 4. load …
Recently I was assigned to a task about adding a file upload feature to a existing nginx server on CentOS. Nginx was chosen years ago because it simply handles some static files only. If the file upload was a requirement, using apache is simpler as computation power isn’t a constraint in our case. Background CentOS 7 …
CentOS 6 1. 移除sendmail 安裝postfix
|
1 2 3 |
# /etc/init.d/sendmail stop # yum remove sendmail # yum install postfix cyrus-sasl mailx |
2. Gmail username and password Simple Authentication and Security Layer (SASL)
|
1 2 3 |
# echo "smtp.gmail.com GMAIL_USERNAME:GMAIL_PASSWORD" > /etc/postfix/sasl_passwd # chmod 600 /etc/postfix/sasl_passwd # postmap hash:/etc/postfix/sasl_passwd |
3. Postfix 設定 vim /etc/postfix/main.cf
|
1 2 3 4 5 6 7 8 9 10 11 12 13 14 15 16 17 |
myhostname = xxxx.hang321.net mydomain = hang321.net # use Gmail SMTP server. Remember to set on Google to allow access with less secure method relayhost = smtp.gmail.com:587 smtp_use_tls = yes smtp_sasl_auth_enable = yes smtp_sasl_password_maps = hash:/etc/postfix/sasl_passwd smtp_sasl_security_options = noanonymous # set the required TLS options smtp_tls_CApath = /etc/ssl/certs smtp_tls_security_level = secure smtp_tls_mandatory_protocols = TLSv1 smtp_tls_mandatory_ciphers = high smtp_tls_secure_cert_match = nexthop |
CApath here, not CAfile 4. 重新啟動Postfix
|
1 |
# service postfix restart |
5. Google 安全性設定 https://myaccount.google.com/security 「我的帳戶」> 「低安全性應用程式」專區 > 「安全性較低的應用程式存取權限」旁邊的 [啟用] 6. 測試mail server 是否有正常寄信 寄信俾自己
|
1 2 |
Testing email, tail -f /var/log/maillog to see the result. # echo "body of your email" | mail -s "This is a Subject" [email protected] |
後記: Goolge 可能係最近才有這個安全性設定,大多數reference 都沒有提及,搞到我白忙一場。 不同Linux distro, CA file name 有分別。
|
1 2 3 4 5 6 7 8 9 10 11 12 13 14 15 16 17 18 19 20 21 22 23 24 25 26 27 28 29 30 31 |
## installation sudo apt-get install apparmor lxc cgroup-lite sudo apt-get install docker.io ## verification sudo service docker.io start sudo docker run hello-world ## show current images sudo docker images ## view location sudo cat /var/lib/docker/repositories-aufs | python -m json.tool ## change docker image installation directory sudo docker ps -q | xargs docker kill sudo service docker.io stop mkdir /your/path/to/docker && chmod 700 /your/path/to/docker sudo vim /etc/default/docker.io # add new line DOCKER_OPTS="-g /your/path/to/docker" ## as root: su chown root.root /your/path/to/docker mv /var/lib/docker/* /your/path/to/docker/ echo "image location moved, see /etc/default/docker.io for new location" > /var/lib/docker/README ## as normal user sudo service docker.io start sudo docker images ## hellow-world listed |
similar to previous blog: http://35.233.158.97/2014/08/16/debian-chroot-on-dsm/ Prerequisite: add custom source: Package Centre > Settings > Package Sources > add Name: SynoCommunity Location: https://packages.synocommunity.com/ Installation: – select Debian Chroot and click install – select yes to install python (SynoCommunity version) as well. – after installation completed, ssh to DSM as root
|
1 2 3 |
root@diskstation> /var/packages/debian-chroot/scripts/start-stop-status chroot bash: warning: setlocale: LC_ALL: cannot change locale (en_US.utf8) root@diskstation:/# |
– now under chroot
|
1 2 3 4 5 6 7 8 9 10 |
##backup and update source list. e.g. from France to Australia ##see https://www.debian.org/mirror/list sed -i.`date +%Y%m%d` 's/fr.debian.org/au.debian.org/g' /etc/apt/sources.list aptitude update aptitude upgrade aptitude install locales dpkg-reconfigure locales dpkg-reconfigure tzdata # optional: packages to install aptitude install less vim curl rsync screen openssh-server bash-completion |
– enable home for …


